My favorite 3 yoga poses..
...Here is what they would be!
Calling all time crunch yogis!
No matter how dedicated you are to your practice, there will always be days when you just don’t have enough time, and people often ask if there were only 3 yoga poses you can do, what would they be. This is a hard question to answer since everyone’s body is different, and has different needs. It also depends on how you’re feeling on a certain day, what you ate, the weather, your sleep, injuries, and so on. There are still a few poses that call my name more often than not, since they satisfy a wide spectrum of needs. Here are a few of my favorites:
Downward Facing Dog ( Adho mukha svanasana)
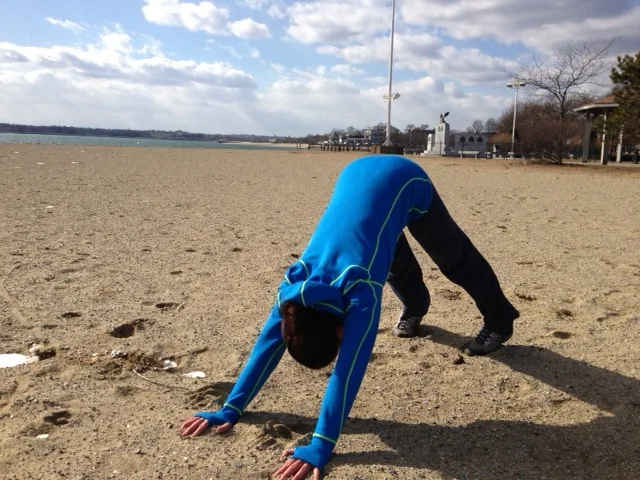
When all else fails...breathe! Heels to the ground is not a priority.
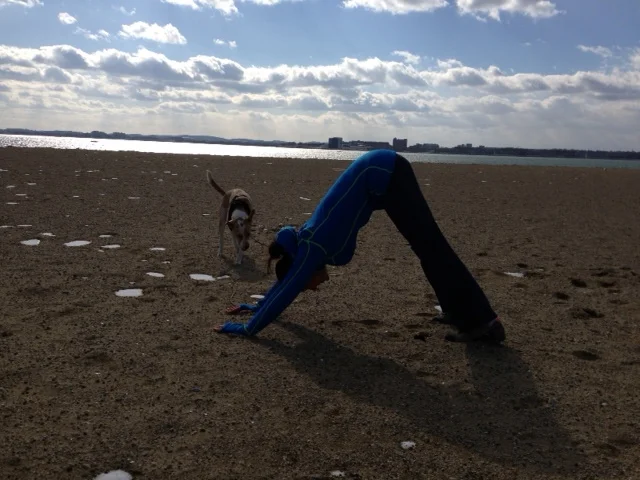
My dog, Willie is onto something! Every time he jumps off the couch he does this pose. Often described as “home base” in most vinyasa yoga classes, the down dog posture works every system of the body.
It calms the nerves and rejuvenates the body at the same time making it a wonderful energy builder and mood lifter. Arms, legs and feet are stretched, core is engaged, and the spine gets long while the blood flow reverses and replenishes the organs. Sound fun?
Willie coming up to check my form. Afterall, he is the pro!
Let me guide you into the pose.
Begin on your hands and knees with your hands directly underneath your shoulders, fingers spread wide. Take a few breaths in and out slowly through the nose. On a deep exhale begin to lift your hips up towards the ceiling, coming into a V-shape with the back of the body straight, and a tiny micro-bend in the elbows (if you tend to hyper-extend). Feet are at a hips distance, hands are shoulder-width apart, and the hips continue to move up and back. Shift your weight slightly toward the inner hands (between thumb and index finger), and draw the navel toward the spine, turning on the core muscles. If you find your hamstrings are tight, it’s ok to keep a slight bend in the knees. It’s okay if your heels don’t touch the ground. Take 5 deep breaths here before coming back to your hands and knees (or childs pose).
Half moon (Ardha Chandrasana)
Warning: Do not try this pose outside in the wind! If I had a block with me, I'd place it under my right arm for balance, and to give more lift to my torso.
One of the class themes I have with my students is called “the booty call” and this pose is always part of my sequence for its ability to tone the muscles of the glutes. Half moon is also a major balancing pose, making it very challenging for a beginner, but do not fret, it can be done against the wall to learn the proper alignment without worrying you’re going to fall. Half moon also firms the waist, hips, abs, and thighs!
This pose takes a ton of strength and balance but looks so effortless. In sanskrit, chandra means moon, or the “glittering light of the moon”. A great reminder that you can smile and look care-free even though you may not feel care-free at first, and little by little, you can actually start to trick yourself into feeling the way you look. This is why I love this pose!
Begin in a low lunge with your weight in your right foot, and start to lift your back leg so that it’s parallel to the ground with your standing leg slightly bent. Open up the hip and bring your body parallel, right arm is directly under your shoulders, fingertips toward ground, (or onto a block a few inches outside your right foot.) Your left shoulder opens up to the side as you reach your top arm toward the sky. Your weight is stacked vertically and the core is engaged. I often have beginner students come down onto the knees and build the pose from the ground upwards, to learn the alignment, and feel the body begin to open before bring it back up to the feet. Be sure to flex the left foot as though you were standing on an imaginary wall, so the muscles of the leg and glutes are engaged, and balance becomes easier. Then smile because you made it!
Thread the needle!
Great stretch for the beginning or the end of a workout!
Almost all my classes begin with this great stretch! An excellent shoulder opener, this pose counteracts most of our day to day activities that are usually spent at a desk, in a car, or in stressful situations where we hold onto our neck muscles. Thread the needle is also great for releasing the back and chest muscles.
Begin in table pose, coming to your hands and knees with your shoulders directly over your hands, and knees under your hips with your head in a neutral position. On your next exhalation, slide your right arm underneath your left arm with the palm facing upwards allowing your right shoulder to come down to the mat, along with your right cheek. As with any pose, be sure to work at your degree of flexibility.
Soften the back and be sure not to press your weight into your head but focus on keeping your hips lifted. Begin to melt the tension away from your neck and shoulders by breathing in and out deeply. Remain here for 5-10 long deep breaths. If you feel a bit “off balance” after you’ve done the first side, that’s great for the pose has done it’s job! Come back to your hands and knees, and work the other side.
*Option to do this pose at the wall for a bit less intensity. The use of a blanket underneath the knees is also encouraged.
The most important thing with any pose, is to take your time, breath, and take away all judgements. Amazing benefits will always follow.


